Tutorial #6 - Get Started with game programming using Allegro, MingGW and VS Code on Windows
About the tutorial
This tutorial is the first in the series
that explain how to get start with game programming using Allegro in C/C++
This tutorial is for learners at level of University Year 2
Introduction
This tutoroial is about how to install MinGW package, Allegro 5 library, Cmake, and VS Code on Windows and make them work together as your IDE for game programming and development using Allegro 5 in C/C++.
Before moving forward, you are assumed to have good knowledge of Winmdows environment, are familiar with using commands on terminal such as PowerShell.
Introduction to MinGW
We are going to learn game programming in C++ with Allegro 5 game library in this book, so we need to install a C++ runtime system on your computer. There are several options for consideration, and we have chosen the one developed and maintained by MinGW and MinGW-w64 project. It is a free open-source package containing a C++ runtime system. We chose MinGW not only because it is free and available for all the popular computing platforms including Microsoft Windows (MS), Linux, MacOS, but also it is well maintained and regularly updated. So, it is a good one too.
To download the latest release for your platform, first visit MinGW home at MinGW-w64 (https://www.mingw-w64.org/). You may see a sandwich menu button on the top-left corner of the window if a left navigation menu is not open, and you need to click to see the menu items including downloads, documentation, and some others.
You may spend some time reading the documents on the site if you wish to know more about MinGW.
To download a package for your platform, click the sandwich button to open the menu and then downloads, you will see a list of prebuilt toolchains and packages that include C++ runtime for various platforms, as show below.
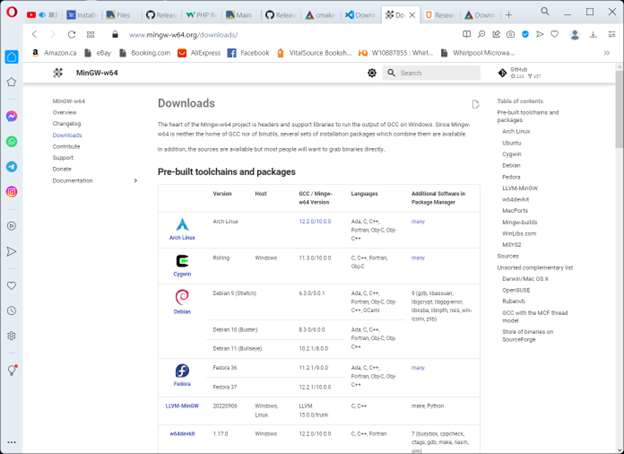
For Microsoft Windows, we choose LLVM_MinGW, which is a toolchain built with Clang, LLD, libc++, targeting i686, x86_64, arm and aarch64 (ARM64), with releases for running as a cross compiler from Linux as well as for running on Windows.
To download your LLVM_MinGW package, go to its GiyHUB home at https://github.com/mstorsjo/llvm-mingw/releases. The latest stable release at the time of writing is llvm-mingw 20220906 with LLVM 15.0.0, as shown below:
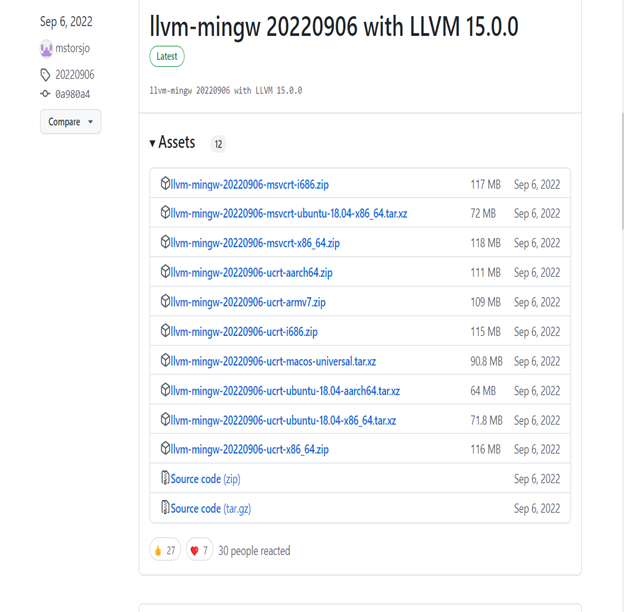
Please note the differences between the packages. The word msvcrt is short for Microsoft Visual C++ Runtime which is the earlier default available for all Microsoft Windows , where the word ucrt is short for universal C Runtime, which is a newer version also used by Microsoft Visual Studio. For our purpose, either is fine but you should choose the same when downloading Allegro5 game library in a later section.
With above in mind, you now should download the right LLVM-MinGW package for your platform. For example llvm-mingw-20220906-msvcrt-x86_64.zip is chosen for a HP Desktop with X64 bit CPU running Windows 11.
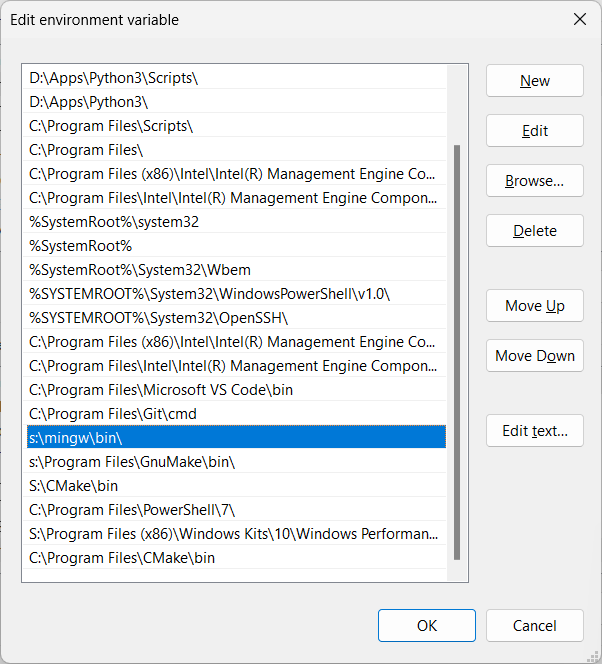
Once downloaded, the installation is simple. All you need to do is to unpack the zip file, and place it wherever you want, such s:/mingw, but make sure there is no space or special characters in its path string. This is a known problem when you do configuration to further set up the IDE.
The next step is to add the path to the bin folder, such as s:/mingw/bin in our case, to the path environment variable, by using the settings on Windows, as shown below:
Introduction to Visual Studio Code
Visual Studio Code, known as VS Code or code, is a source code editor which runs on your desktop. Although it comes with built-in support for JavaScript, TypeScript and Node.js, VS Code is not considered as an IDE by Itself. However, it can be made to a very powerful integrated development environment (IDE) for many different programming languages such as JavaScript/Node.js, TypeScript, C++, C#, Java, Python, PHP, Go, .NET, Julia, R, Rust, PowerShell, Markdown, HTML, CSS, SCSS, and JSON, with a right set of extensions readily accessible from inside of the VS Code. VS Code is available for Windows, macOS and Linux. Therefore, once it has become a valuable tool to learn because once you are skilled with VS Code, you can program and develop software system in different programming languages and for different platforms.
A thorough introduction to VS Code can be found at its website at https://code.visualstudio.com/ , in the section below we will focus on how to install VS Code and setup the IDE for our very purpose of this course – game programming in C++ with Allegro 5 game library.
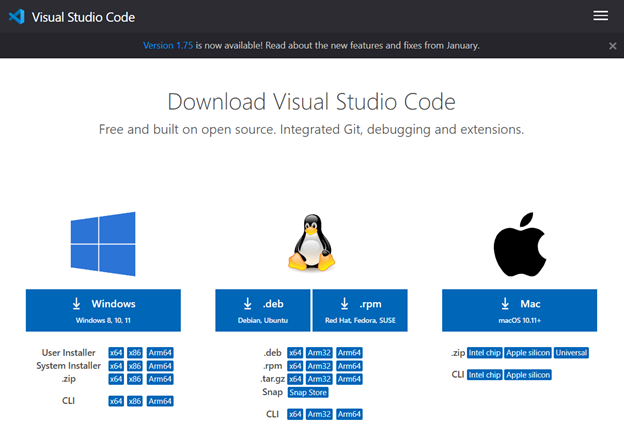
To begin with, you first need to download the installer from https://code.visualstudio.com/ for your platform Windows, Linux or Mac iOS, as shown in the snapshot of website below.
Once installed, the system can be launched from your desktop, as shown in the following
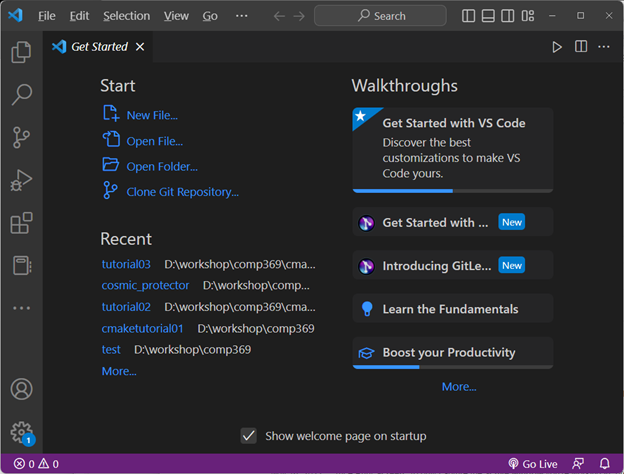
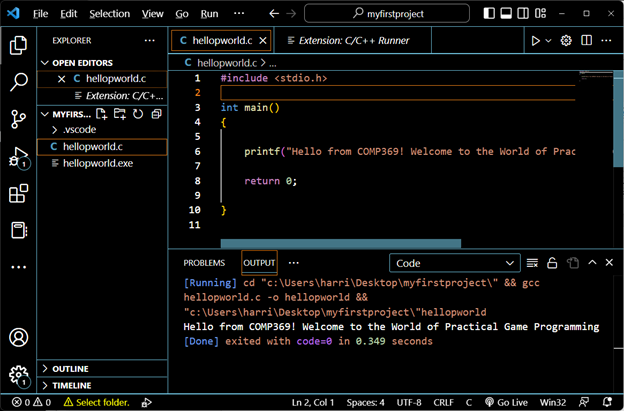
With a C++ runtime installed in the previous section, and VS Vode installed just now, we can open VS Code and write a simple program in C/C++. The first step is to create a new folder, named myfirstproject on your desktop or your home directory, and then open the folder within VS Code, and then create a new C file within the folder, named helloworld.c by clicking the new file button or new file menu item, and then copy the following code to the file and save.
#includeint main() { printf("Hello from COMP369! Welcome to the World of Practical Game Programming"); return 0; }
Now you can click the run button, or one of menu items under Run menu to test it out. You may be asked to select a C++ runtime if not already chosen one for VS Code, or there are more than one available. You may also be asked to install a C/C++ runner extension. Select C/C++ runner by frannek94. Now you should be able to run the code and see the result in the terminal on the lower section of VS Code, as shown in the screenshot below.
Congratualtions! But so far, you are only good to make a single file C/C++ program with VS Code. Next, you need to install Cmake and use it to work on multiple files in a program.
Introduction to cmake and ninja
Developers and programmers are often working on projects involving many files which often depend on each other, it would be an unmanageable task to compile one by one in the right order and then link the object files together to make an executable. That is how Make and Makefiles come into play, where a Makefile specifies the rules to compile the program source files and link the object files into an executable or a library or something else.
As one can imagine, a makefile for a large project can be very complicated and hard to create and manage too, though it eliminates the need of compiling source files one by one and link all the object files manually. Can a makefile be generated automatically? Yes, that is the main job of Cmake.
CMake is an open-source, cross-platform family of tools designed to build, test and package software. CMake is used to control the software compilation process using simple platform and compiler independent configuration files and generate native makefiles and workspaces that can be used in the compiler environment of your choice. The suite of CMake tools were created by Kitware in response to the need for a powerful, cross-platform build environment for open-source projects such as ITK and VTK.
To get Cmake installed on your computer, go to https://cmake.org and download the latest binary version for your platform. For windows, you may download the msi file so that the file will automatically run to install once downloading is complete. Please choose to add the location of the Cmake you installed to the path of environment, so that cmake command and other tools can be found when needed.
Here is CMakeLists.txt right under the project directory for Cmake:
    cmake_minimum_required(VERSION 3.25)

    project(CMakeTutorial01)

    add_executable(CMakeTest helloworld.c)
Once Cmake is installed on your computer, you also need to install Cmake language support for Visual Studio Code to your VS Code, by clicking the extension button, and search Cmake, and clicking install, if not already installed.
To get ninja installed on your computer go to Releases · ninja-build/ninja (github.com) and download the latest binary of ninja for your platform, either windows, Linux or Mac. To install it, just unzip the file to get the single exe file, copy and paste it into cmake bin directory. Here is the tasks.json under .vscode:
Here is the tasks.json under .vscode:
    {
        "tasks": [
            {
                "type": "cppbuild",
                "label": "C/C++: clang.exe build active file",
                "command": "S:\\mingw\\bin\\clang.exe",
                "args": [
                    "-fcolor-diagnostics",
                    "-fansi-escape-codes",
                    "-g",
                    "${file}",
                    "-o",
                    "${fileDirname}\\${fileBasenameNoExtension}.exe"
                ],
                "options": {
                    "cwd": "S:\\mingw\\bin"
                },
                "problemMatcher": [
                    "$gcc"
                ],
                "group": {
                    "kind": "build",
                    "isDefault": true
                },
                "detail": "Task generated by Debugger."
            },
            {
                "type": "cmake",
                "label": "CMake: build",
                "command": "build",
                "targets": [
                    "all"
                ],
                "group": "build",
                "problemMatcher": [],
                "detail": "CMake template build task"
            }
        ],
        "version": "2.0.0"
    }
Install Allegro 5 library
The home of Allegro library was at https://www.allegro.cc and the website is still alive, but links to latest release of the library can be found at https://liballeg.org. From the website you need to download the latest binary release right for your platform, especially the platform you chose when downloading MinGW in the previous chapter. If your platform is Windows, scroll down to Windows Binaries, and click Allegro 5.2 binary packages to reach download page on GitHub, as shown below.
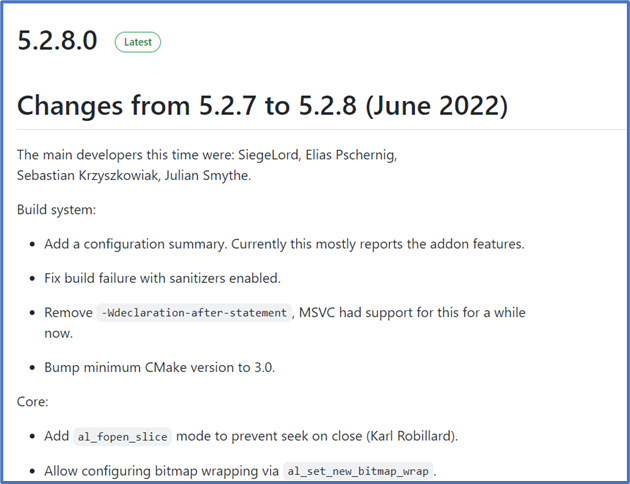
Scroll down further to Assets, and click the down arrow or Assets to open a list of binaries as shown below
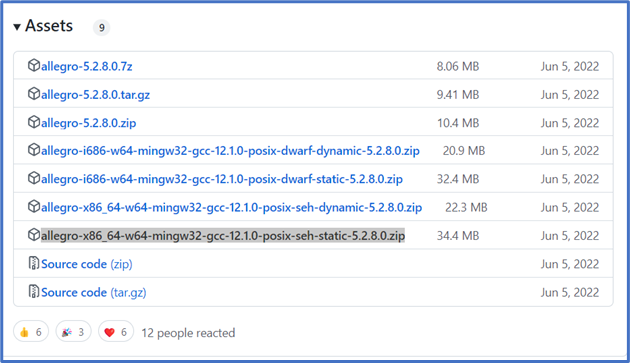
and then download the package right for the MinGW system you have installed on your computer, such as allegro-x86_64-w64-mingw32-gcc-12.1.0-posix-seh-static-5.2.8.0.zip in our case. Note that there are a dynamic version and a static version library for the same platform, you need to download and install the static version.
Once downloaded, you need to unzip the package, and copy the bin, include and library folder including all the files under each entirely to the root folder of your MinGW installation, which means that files under bin folder will be copied to the bin folder of MinGW, files under cinclude will be copied into the include folder of MinGW, whereas files under lib folder will be copied into the lib folder of MinGW.
Now you can create a project folder, and open it with VS Code, then create a file named main.c, and then copy the following code into the file and save:
#include#include #include int main() { al_init(); al_install_keyboard(); ALLEGRO_TIMER* timer = al_create_timer(1.0 / 30.0); ALLEGRO_EVENT_QUEUE* queue = al_create_event_queue(); ALLEGRO_DISPLAY* disp = al_create_display(320, 200); ALLEGRO_FONT* font = al_create_builtin_font(); al_register_event_source(queue, al_get_keyboard_event_source()); al_register_event_source(queue, al_get_display_event_source(disp)); al_register_event_source(queue, al_get_timer_event_source(timer)); bool redraw = true; ALLEGRO_EVENT event; al_start_timer(timer); while(1) { al_wait_for_event(queue, &event); if(event.type == ALLEGRO_EVENT_TIMER) redraw = true; else if((event.type == ALLEGRO_EVENT_KEY_DOWN) || (event.type == ALLEGRO_EVENT_DISPLAY_CLOSE)) break; if(redraw && al_is_event_queue_empty(queue)) { al_clear_to_color(al_map_rgb(0, 0, 0)); al_draw_text(font, al_map_rgb(255, 255, 255), 0, 0, 0, "Hello world!"); al_flip_display(); redraw = false; } } al_destroy_font(font); al_destroy_display(disp); al_destroy_timer(timer); al_destroy_event_queue(queue); return 0; }
CMake will automatically generate a CMakeLists.txt within your project folder. Please remember that this is the master file CMake will need for a project, and the name must be exactly the same.
    # link required allegro libraries
    TARGET_LINK_LIBRARIES(testhello allegro allegro_font allegro_ttf allegro_image
           allegro_primitives )
Note the list of allegro libraries should include at least allegro, others can be added as needed.
While making the above changes to the CMakeLists.txt file, you may also check the source file name within the add_executable(
As soon as it is saved, CMake will generate a (new) Makefile under build subfolder of the project folder.
./testhello
If you see a window launched with Hello World! In it, then congratulations! You have succeeded. Congratulations!
References
- 1 - The official getting started with Allegro 5, https://liballeg.org/a5docs/trunk/getting_started.html
- 2 - Allegro Vivace, a good tutorial on introduction to programming with Allegro 5, https://github.com/liballeg/allegro_wiki/wiki/Allegro-Vivace
- 3 – install Allegro 5 on Ubuntu Linux, https://github.com/liballeg/allegro_wiki/wiki/Install-Allegro-from-Ubuntu-PPAs
- 4 - How to port Allegro project into Allegro 5, https://github.com/liballeg/allegro_wiki/wiki/Porting-Allegro-4-to-5
- 5 - Amit's game programming Information http://www-cs-students.stanford.edu/~amitp/gameprog.html
- 6 - Allegro Wiki, https://github.com/liballeg/allegro_wiki/wiki